FPS Enhancer
-Reduces the number of Draw Calls, due to which it greatly increases FPS
-Generates texture atlases
-Combines meshes
-Easy to use
-Tiling support
-Support for baking atlases on CPU and GPU
-It has a completely non-destructive workflow.
-You can do backing on scene or in prefab (But not the both for an asset).
-It is possible to use different shaders in one atlas
-Ability to use custom shaders
-Easy adaptation to custom shaders
-Build-in, URP, HDRP support.
-Built-in support for Vroid (Build-in, URP, - shaders - VRM/MToon, VRM10/MToon10 and additional UniGLTF\UniUnlit, VRM/UnlitCutout, VRM/UnlitTransparent, VRM/UnlitTransparentZWrit.
-Generation of Lossless atlas (atlas optimization using Unity can be disabled).
-Ability to select texture atlas resolution
-Support Combined Textures (Mask Maps)
-Support mip map.
-The material template that the resulting mesh will receive is customizable by you.
-Support for static and skeletal meshes.
- Merge meshes larger than 64k vertices.
- Supports meshes with multiple materials. Slots with equal materials are combine into one.
-Vertex color is saved.
-Blendshapes support.
-LOD support -requires third party add-on package Nanolod (free) or Unity Mesh Simplifier (free).
-LOD support for skeletal meshes.
-Support for generic meshes.
-It supports Animation Controller and the legacy animation system as well.
-Attaching non-skeletal meshes to skeletal ones (accessories, weapons).
After baking you can add, remove or modify accessories or weapons of your character but a rebaking will be required.
-You can save existing colliders or generate a mesh collider for the final mesh.
-Supports Unity 19.3 and later.
- Contains source code
-Detailed manual
*To create LODs in Unity, you will need either NanoLOD or Unity Mesh Simplifier, both packages are free.
*To save meshes in the fbx format, including for the purpose of creating LODs in an external program, it is necessary to install an fbx exporter.
*It is recommended to install the free Burst package; it will accelerate the packing of texture atlases and meshes by utilizing SSE instructions.
Manual
A large number of processor calls to the video card (batches) often leads to low FPS. This scene presents a situation where a large number of objects of the same type create a very high load on the system. The walls consist of only three types of bricks. But the processor contacts the video card to render each specific brick instance (to be more precise, each specific texture on each instance).
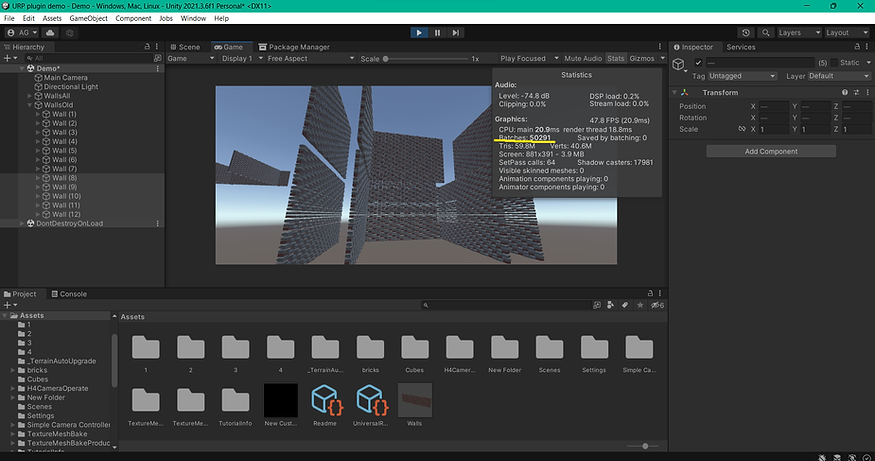
To reduce the load on the system, optimization is carried out in two stages - sintering texture atlases and meshes. When sintering texture atlases, a common UV scan is created for all merged objects, which includes all the scans of objects in one field, after which a set of common textures is created, on which many objects are present at once (i.e., common Albedo, common Normal Map, etc.) If all objects do not fit into the size of the texture atlas you specify, as many atlases as needed will be automatically created, and the plugin will try to use the minimum space on the atlas. If many objects in your map have the same texture, when sintering atlases and meshes, this texture will be loaded into memory only once.
The next stage of combining is sintering the meshes. Meshes whose textures are on atlases can be combined into one, thereby greatly reducing the number of batches. Keep in mind that all meshes that come into view will be loaded into memory, so it is better to group them based on visibility at a particular moment. Also keep in mind that you will not be able to move parts of the sintered meshes, so if, for example, a door is planned to open in your project, you do not need to sinter it into a common mesh. But you can bake it into satin. It is better to bake materials using different shaders into different atlases. That is, for example, if you have a building with transparent windows, and you sinter the windows into one atlas with opaque walls, everything will become opaque (or transparent). Also, for example, if you use one object with a specific shader, but it is used in your scene many times, there is no point in baking an atlas for it, but it makes sense to bake meshes right away.
Atlas Backing
1. If we optimize objects located on the stage, all objects must have a common parent.
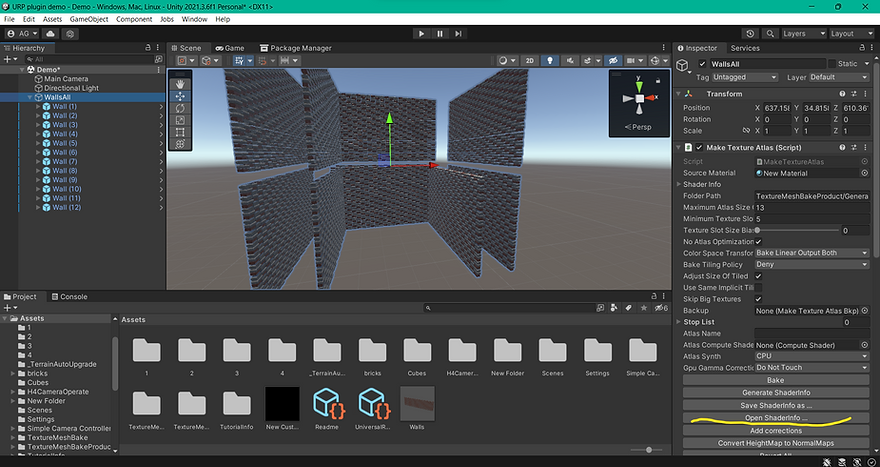
2. Adding the Make component Texture Atlas to parent component

3. Specify the base material. To do this, just drag it to the Source line Material. This material serves as a sample shader to which the sintered material shaders will be referenced.
4. If you used stock material, click the open button shader info otherwise see instructions for custom materials. If you are working with a VRM model, use VRM 10 profile for version 1.0 and higher, and VRM profile for older versions
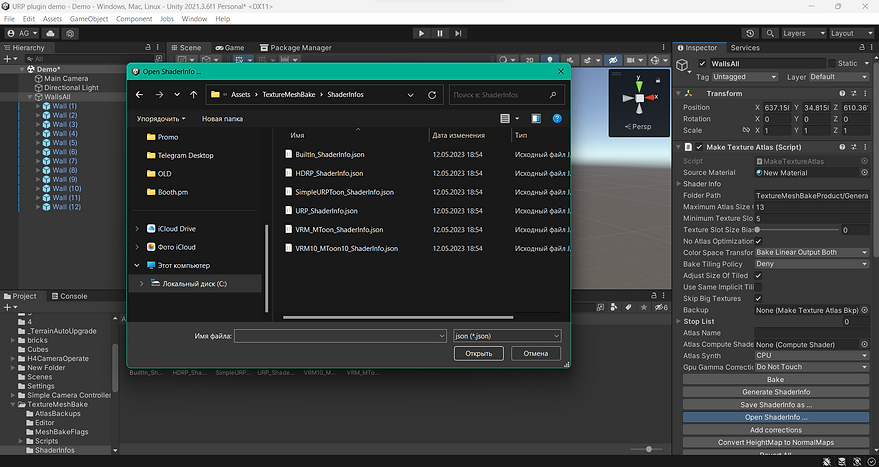
5. Open the \Assets\TextureMeshBake\ShaderInfos folder in your project and select the desired shader type and click "open"
Briefly describe your degree and any other highlights about your studies you want to share. Be sure to include relevant skills you gained, accomplishments you achieved or milestones you reached during your education.
6. If conversions of different types of materials are required, click " add" corrections” For VRM material , select the Vroid version . If you used https://github.com/simplestargame/SimpleURPToonLitOutlineExample then you need to use shader info Simple Toon. If https :// github was used. com / simplestargame / VRM - Toon - for - Universal - RP, you can use VRM MToon shaderinfo.
7. Option " convert " Metallic To Specular” allows you to convert a metallicity map into a specular map if among the objects sintered into one atlas there are materials with metallic workflow if the target material uses specular workflow _ Convert option Specular To Metallic is used in the opposite situation. These options are experimental and may produce some distortion. If sintering is performed for materials from the same workflow, these options are not needed. The item is not relevant for VRM. For HDRP there is an additional Energy option conserving, which allows you to take into account the law of conservation of energy during the conversion of materials, subtracting the gloss intensity from the albedo.
8. Subtype is set by default according to Render pipeline of current material. The item is not relevant for VRM.
9. Point Do not _ Correct HDR Colors needs to be switched to a different state if emission maps are not baked correctly. This is due to the peculiarities of rendering implementation in different versions of Unity.
10. Create M.O.S. Texture is used to combine Metallic, Smoothness and Ambient maps Occlusion into one texture. The option is experimental. During sintering of the atlas, this function is implemented automatically. This button is only needed to create merged maps on materials that you are not printing an atlas on. The item is not relevant for VRM.
11. Specify the path to save the atlases in the “Folder” column Path ". This folder should not contain third-party files.
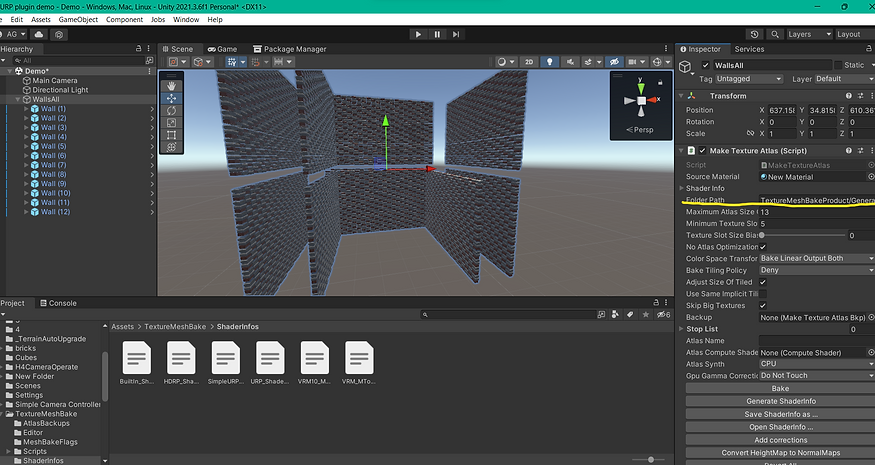
12. Atlas size order – the maximum size of the sintered texture atlas (the number is n , where 2^ n is the number of pixels in the texture side)
Select the texture size you need. This size is the maximum usable size. Atlases will be automatically generated in such a way as to use the minimum possible space. That is, if you set, for example, the size to 4096, atlases 4096 and 2048 can be generated, if the textures do not fit into one atlas 4096, but can fit into one 4096 and one smaller one.
Order Texture size
13 8192*8192
12 4096*4096
11 2048*2048
10 1024*1024
9 512*512
8 256*256
7 128*128
6 64*64
5 32*32
4 16*16
3 8*8
2 4*4
1 2*2
13. Texture slot min size. – the minimum size of the texture inside the atlas. If a smaller texture is included in the atlas, it will be stretched to the specified minimum size. This is necessary to avoid some possible defects. The default value of 5 is suitable for most cases. Smaller values may result in distortion. Large values increase the consumption of atlas space.
14. Checkbox No Atlas Optimization disables Unity texture compression, which allows you to make the atlas look as close as possible to the original textures. It is enabled by default. If an insufficient video memory error occurs when sintering atlases, you can disable this option or lower Atlas size order.
15. Color space transform defines Steps algorithm _ On which it is necessary to convert the gamma color space into linear and vice versa. If you do not plan to work with the texture via the API or use the colorspace gamma, leave the default value.
-
Bake Linear Output Both – converts input textures and colors into linear space, if necessary, bakes atlases in linear space, not mask texture converts to gamma space (to see the correct colors in the graphics editor).
-
Linear Only – everything is the same, but all textures are saved in linear space. This is useful if you plan to work with the texture via the API.
-
No conversion — no color space conversions are performed. Everything is baked as is. (created to work in gamma space, but work in gamma space has not been tested because gamma space is considered a rudiment, for example it is not supported in HDRP and gives low quality lighting in URP)
16. Backup. If you plan to re-import the original textures, meshes and materials on which the atlases were created and not have problems when baking these atlases, you need to create a backup asset. To do this, click on an empty space and select the appropriate option.
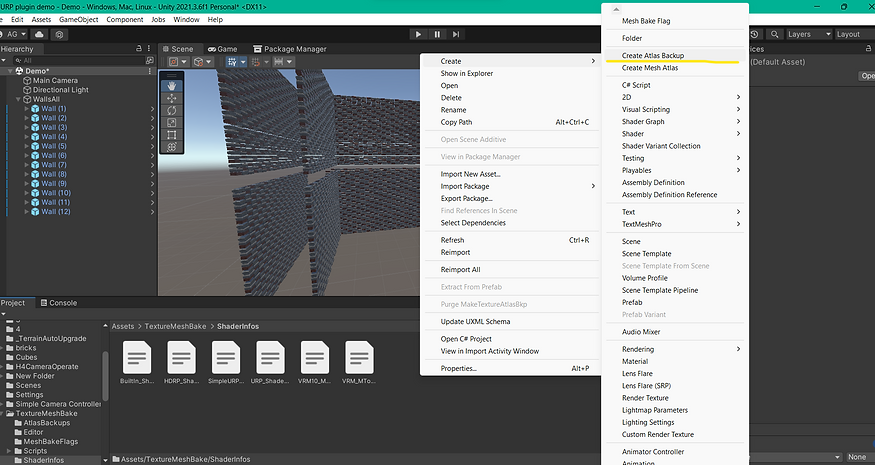
Specify the selected asset in the backup column . The asset should be installed at the time of baking and baking the atlases, but removed at other times: the asset should not be loaded in the editor unnecessarily, since this loads a large number of textures into the engine. It is recommended to create several of these assets for different bakes, rather than saving everything in one.
17. Stop List – you can add materials to this list that you do not want to bake into the satin.
Click Bake to create a texture atlas. It can take some time.
When part of the UV scan goes beyond the square from 0 to 1, this can lead to incorrect sintering of the atlas. The utility itself will offer the opportunity to exclude such meshes from atlas sintering. In VRM models this is often hair. In some cases, the problem can also be solved by adding specific materials to the Stop List section in the Make component settings Texture Atlas.
When the atlas is sintered, sometimes an error occurs, leading to a distortion in the appearance of the material. To fix it, you need to open the material in the editor (just select it in the Project window so that it appears in the Inspector). For URP and Build - in, this will be enough. For HDRP, you also need to change any material parameter and then return it back.
18. If you need to print the resulting atlas, click Revert all. If you sintered a lot of objects, this will take some time.
Mesh Backing
1. Add component “Mesh Bake Root” to root component. (this component is installed on game object, which will become the attachment point for the sintered mesh)
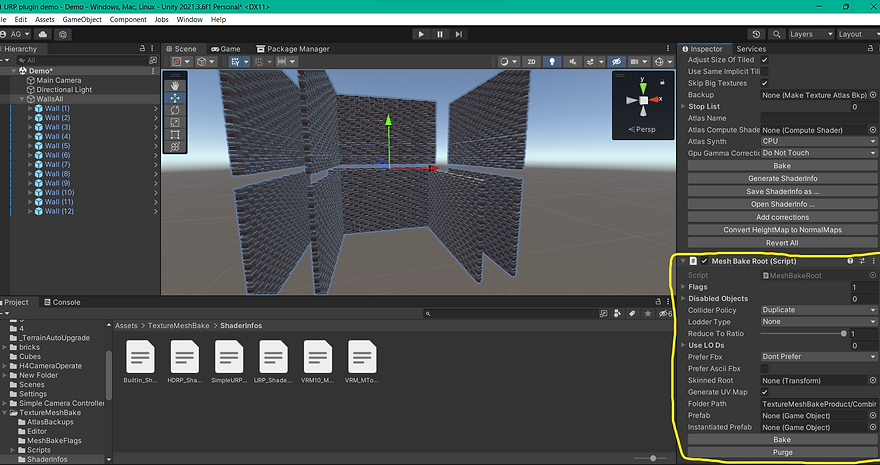
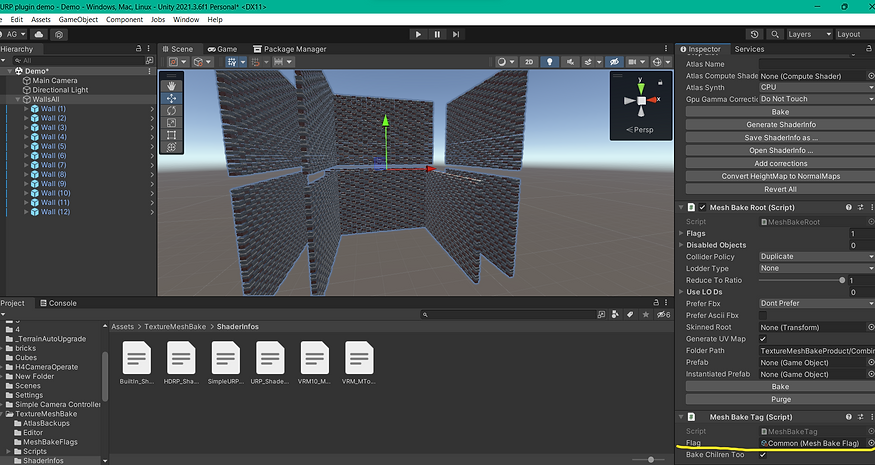
2. Add component “Mesh Bake Tag” to root component. (This is used to mark the child elements of the Mesh Bake Root that needs to be baked. For Mesh Bake Root needs to specify a list of flags by which it will determine which objects to bake. Each tag is marked with one flag. A tag without a flag ( None ) is used to mark objects that do not need to be sintered. All child elements of an element with a tag are controlled by that tag. If an object is a child of several tagged objects, then only the closest parent plays a role. (That is, you can, for example, add a tag to a room, and then add additional tags to doors that are children of the room, so as not to bake them, while maintaining the ability to move). The Bake Children Too option allows bake all children meshes of this tag . If you disable it, then only meshes that lie directly on the component with this tag will be baked.

3. Add Flag to Mesh Bake Root. Add the Common flag. It exists by default. If you just want to sinter a group of objects, it will be enough, you can go straight to step 5. If you need to exclude some objects from sintering or sinter several different groups of objects (for example, you want to divide the map into several visibility areas), you need create several flags.
4. To create a flag, you need to right-click in the Project window, select Create, then Mesh Bake Flag. You can now add a new flag to the list of Mesh flags Bake Root.
5. When we have a list of flags, we need to specify flags for specific tags. Now the element on which the Mesh is installed Bake Tag with the specified Mesh Bake Flag and all its children, except those that have their own tag, will obey that tag. If you just need to exclude some object from sintering, just add Mesh to it Bake Tag, you don’t need to specify anything. But keep in mind that if an object has child elements, they will not be sintered either.
6. Next, we choose what we will do with colliders in the collider column policy.
Duplicate – duplicate all colliders from sintered meshes for a new mesh.
Mesh Collider – create a single mesh collider for the final mesh.
Preserve Collider – do not change the original colliders.
None – do not create colliders for the new mesh.
Everything – technical meaning, not used.
7. Use LODs – see LODs instructions.
8. Skinned Root (skeletal meshes only) Specify Root Bone dragging Root Bone character in the Skinned column Root in Mesh settings Bake Root . This example uses a model from Vroid Studio, to import it you will need the VRM add-on , which can be downloaded for free at

9. Generate UV Map – creating a lightmap for the final mesh. Doesn't work with blend shapes. Remove for skeletal meshes.
10. Folder Path – path for saving the final mesh.
11. To bake the meshes, click Bake. Destroys previous sintering results of mesh data, if any.
12. To destroy the sintered mesh, press Purge. Your original meshes are not affected.
13. Hide Backed – meshes and shows the original (without baking) Show backed shows the hidden one.
Character accessories backing
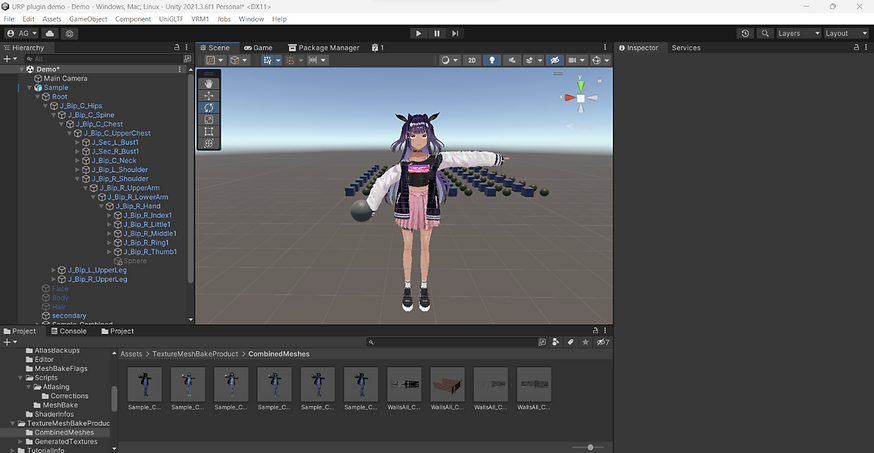
1. Place the accessory in the desired position and make it a child of the character bone to which you attach it in the Hierarchy menu.

2. Add a Mesh Bake Tag to the accessory and add a flag.
3. Bake the character mesh by clicking Bake in the Mesh bake root component of the character root component.
LODs
To use lods you need one of the additional packages:
1. Nanolod (бесплатно)
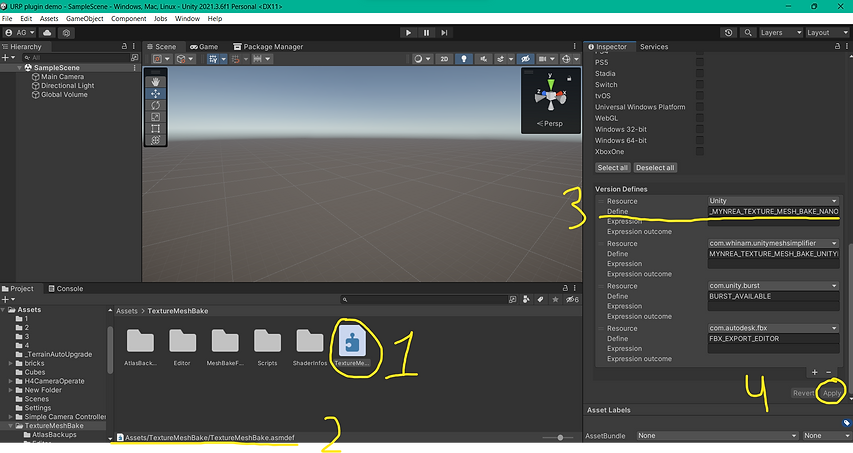
This loder does not support blend shapes , vertex colors and skeletal meshes. Suitable for static meshes) To connect it, you need to download it from the asset store and install a conditional compilation directive (since it is impossible to track the presence of this asset in the project using standard Unity tools. To do this, select the file TextureMeshBake. asmdef (1), located at Assets / TextureMeshBake (2), in the inspector in the top line of the Define section of the Version section Defines (3) remove the underscore at the beginning of the name and click Apply (4).
2. You can also use Unity Mesh Simplifier (free). To do this, go to the package manager, click + in the upper left corner, select Add package from git URL and enter the link in the field


Loding
1. In the MeshBakeRoot settings in the Use section LODs Add the required number of LODs.
2. In the Screen column Relative Transition Height for each LOD you indicate the proportion of the screen area occupied by the object in the camera, and in the Reduce column To Ratio – the proportion of the original number of polygons saved by this LOD. Take into account the features of the model and its perception.
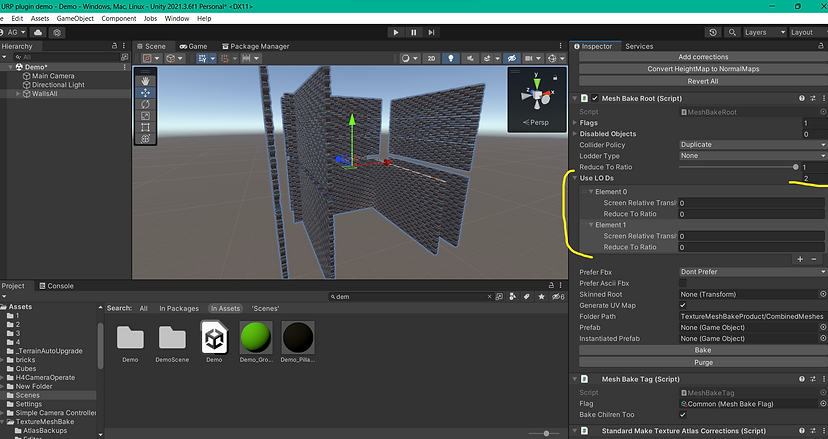
3. Click Bake to create LODs.
4. The logs have been generated.
Texture atlases for custom shaders
1. If we optimize objects located on the stage, all objects must have a common parent.
2. Add the Make Texture Atlas component to the parent component.
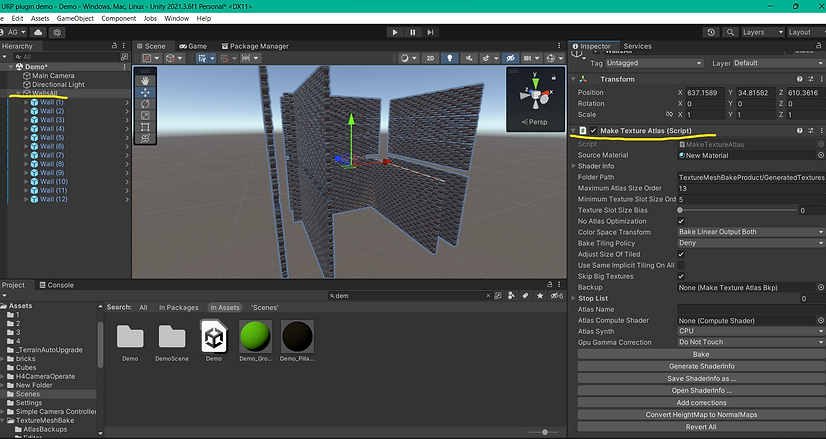
3. Specify the base material. To do this, just drag it to the Source Material line. This material serves as a sample shader to which the sintered material shaders will be referenced.
4. Click generate shader info in the Make Texture Atlas component. A link to your shader should appear in the Allowed Shaders section. The recognized shader parameters will appear in the Textures section below. The parameters are recognized empirically, so something may be recognized incorrectly. If you are using several custom shaders, you can repeat the procedure for the next one.
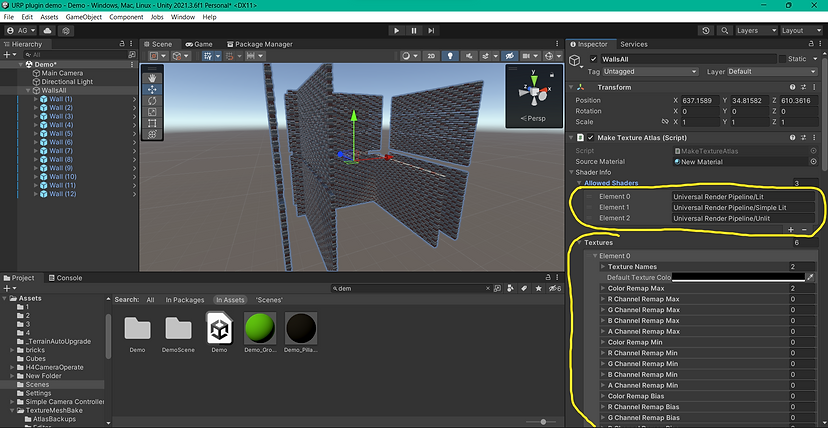
5. Check the Texture list for errors. Each element is a rule for baking the atlas. Each rule is responsible for each individual texture included in the shader. No rules are created for parameters that are not used in your shader. The input parameters for baking the atlas are textures, scalars and tints, since all other transformations are performed by the shader logic and do not need to be written to the atlas. The script analyzes the shader parameters and compiles a list of objects that will be included in the atlas. The texture name fields contain the names of the textures used by the shader. Color remap Max graphs contain material fields in which the atlas sintering system will look for tint. In some RGBA shaders, tint channels are stored separately because they perform different functions. In this regard, different graphs are used for them. Color Remap Max graphs contain tint applied to white, while Color Remap Min graphs contain tint applied to black. Such tints are used in HDRP and can also store RGBA channels separately. In addition, in HDRP there is a Color Remap Bias constant, which is added to the texture that has already undergone Color Remap Max and Color Remap Min. Color Remap, also from HDRP, is applied last.
6. Each Element is a rule. The Texture Names field contains a list of field names in which to search for the texture described by this rule. There can be several names if we sinter materials with different shaders (different shaders can have different names for the same texture)
(the texture name in the shader is highlighted in yellow)
To check whether the rules are generated correctly, you need to
A. Review the shader structure and make sure that the list of textures in the rules matches the textures used in the shader. Please note that some textures cannot be sintered into satin. For example, if the UV coordinates in the texture depend on time or position in space. Adjust if necessary.
B. Textures may have tints. The tint itself is a scalar and cannot be baked into a satin, but it can be baked into a texture. You need to make sure that if a tint is applied to a given texture in a shader, then the corresponding tint must be specified in the rule for this texture. You can specify tints without textures in the rules, but this will lead to the fact that tints without textures will be reduced to the arithmetic mean. You also need to make sure that the method of applying the tint matches that described in the shader. If necessary, correct it.
B. Inverse Tint. Used for Ambient occlusion. Allows you to apply tint not to the original texture, but to its negative.
D. Default Color – the field has been added for the future, at this stage the color should be white, if it is not white, set it to white.
D. Column Type LDR – Stores the normal color. HDR – Colors that can have an intensity greater than one. Normal – normal map. Mask – textures that do not store colors (for example roughness, metallic, etc.). Make sure the type matches your texture. Correct me if it's wrong.
You can also write your own type of corrections by creating a descendant of the MakeTextureAtlasCorrections class that will allow you to implement non-standard functionality.
